Snap fit joints are everywhere in product design because they make assembly fast and cheap. Think about phone cases, medical devices, or even household appliances — snap fits hold parts together without screws or glue. But making snap fits work reliably is not easy. If the fit is off by even a tiny amount, the parts might not snap together well, or worse, break during use.
This is why testing prototypes is crucial. CNC machining lets engineers make prototypes that match final parts closely in size and material. Testing these prototypes early catches problems before the costly mold making stage. This article walks through the process of snap fit prototype testing with CNC machining, sharing practical tips and a real case example with numbers to guide you.

What’s a Snap Fit, and Why Is It Hard to Get Right?
At its core, a snap fit is a clever little hook or tab that bends just enough to snap into place and hold two parts together. The idea seems simple, but the devil’s in the details:
Tiny gaps matter: A difference of 0.2 mm can make a snap fit too loose or impossible to assemble.
Material counts: Plastics like ABS are stiffer and can crack under stress; nylon bends more but might wear out faster.
Precision machining is a must: Manufacturing tolerances need to be within ±0.01 mm for reliable fits.
Environment changes things: Heat or moisture can cause materials to expand or shrink, affecting fit.
CAD software can help design snap fits, but it can’t replace real-world testing. That’s where CNC prototypes come in.
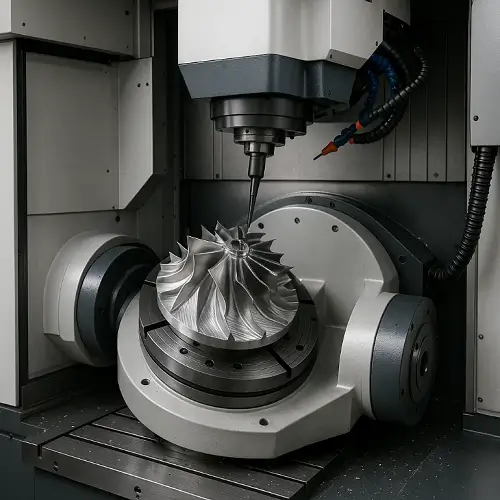
Why Use CNC Machining for Snap Fit Prototypes?
Some teams try 3D printing or quick injection molding first, but those methods often miss the mark on precision or material properties. CNC machining stands out because:
It hits tolerances tight enough to test snap fit function accurately.
It uses actual production materials like ABS, nylon, or Delrin.
The surface finish is smooth, so parts slide and snap like the final product.
Prototypes come fast, letting you test multiple versions quickly.
In short, CNC prototypes give you a realistic preview of how your snap fit will behave in production.
How to Test Snap Fit Prototypes
Testing snap fits isn’t just about trying to snap parts together. You want to be thorough:
Assembly Force: Measure how much force is needed to snap parts together. Too much force means hard assembly; too little means parts might fall apart.
Disassembly Force: How easily can you take the parts apart? For maintenance or repair, this matters.
Durability Testing: Snap fits get flexed over and over. Testing hundreds of cycles simulates real use.
Environmental Testing: Heat and humidity can warp parts. Test your prototype in those conditions to catch surprises.
Dimensional Checks: Use precise tools like CMMs to measure if your snap fit dimensions match your CAD design.
Real-World Case: Medical Device Snap Fit Enclosure
Here’s an example from a client in the medical industry who needed a snap fit enclosure for a device.
The enclosure needed quick assembly without tools but had to hold internal components securely through 500+ assembly cycles.
We made prototypes on a CNC machine using medical-grade nylon to match the final product.
The snap fit features were machined with a tolerance of ±0.01 mm.
Assembly force measured about 6.2 N — comfortably in the 5–7 N target range for user-friendly assembly.
Disassembly force was 4.8 N, so parts came apart easily when needed.
We ran 600 snap/un-snap cycles; no cracks or permanent deformation appeared, exceeding client requirements.
To simulate hospital conditions, prototypes went through 72 hours at 80°C and 85% humidity. Dimensional changes were less than ±0.03 mm, and snap fit forces stayed steady within 5%.
Initial tests showed one latch was too tight, causing cracks after 200 cycles. We increased the latch gap by 0.1 mm and added a 0.5 mm radius to reduce stress.
After redesign, prototypes passed all tests without failure.
This saved the client an estimated $150,000 in tooling changes and production delays.
Tips for Designing Snap Fits That Work
Based on experience, here’s what makes snap fits successful:
Design with a 0.2–0.5 mm gap depending on your material’s flexibility.
Avoid sharp corners and thin walls; these cause breakage.
Simplify features for CNC machining—less complex shapes machine better and faster.
Pick materials that balance flexibility and durability.
Test early and iterate often using CNC prototypes.
Talk with your CNC manufacturer to understand their capabilities and limits.
Frequently Asked Questions (FAQ)
What is the ideal tolerance for snap fit prototypes?
For most plastic snap fit designs, the ideal clearance between mating parts falls between 0.2 mm and 0.5 mm. The exact value depends on the material’s flexibility and how tight the fit needs to be. CNC machining allows you to test these tolerances with high precision before committing to tooling.
Which materials are best for CNC snap fit prototypes?
Common materials include ABS, Nylon (PA12), and Delrin (POM). ABS offers good rigidity, Nylon provides flexibility and fatigue resistance, while Delrin balances strength and low friction. The material should match your production specs as closely as possible to reflect true performance.
How many cycles should a snap fit withstand during testing?
That depends on the product’s usage. For consumer electronics, 100–300 cycles may be enough. For medical devices or wearables, clients often target 500–1,000 cycles to simulate long-term use. CNC prototypes let you run fatigue tests and observe any signs of cracking or permanent deformation.
Can I test snap fit designs without using the final material?
You can, but the results may not be meaningful. Snap fits rely on elastic deformation, and material stiffness directly affects how they behave. Using production-grade or equivalent materials in CNC prototypes gives you more accurate feedback.
How accurate is CNC machining for testing snap fits?
CNC machining can consistently hold tolerances of ±0.01 mm or better, making it highly suitable for snap fit features. This level of accuracy ensures your prototypes reflect real-world assembly conditions and let you test minor design changes with confidence.
Is it worth prototyping snap fits before tooling?
Absolutely. A small design mistake in a snap feature can cost thousands in mold changes. CNC prototyping is a low-risk, fast, and cost-effective way to validate your snap fit design before you invest in injection molds.
Conclusion
Snap fit prototype testing using CNC machining is an essential step in product development. It lets you catch design flaws early, avoid costly mold fixes, and ensure your product snaps together perfectly every time. Real-world testing with precise prototypes saves time, money, and headaches down the line.
If you want accurate, fast CNC snap fit prototyping and testing, our team is ready to help you get it right the first time.Get quote!